Over my time writing this blog, the post that has been read and shared the most is by far Black is the New Black. Wood look tile is a highly debated topic on home websites such as Houzz, HGTV, and various blogs. After nearly a year of living with our wood-look tile, I have decided to revisit my post from a year ago. This post will be my opinion based on my experiences.
When it was time for us to make a flooring decision for our new home that we were remodeling, we really wanted wood. We had some major concerns with adding real wood though 1.) we have two young, rambunctious boys 2.) we live in Florida where heat and humidity are a problem 3.) we have a pool and water is frequently tracked through the house. Given these concerns, we decided that wood was not in our best interest. After a long search, we went with Marazzi American Heritage porcelain planks in the color spice. We have been living with this tile for nearly a year and I would like to address some of the most frequent questions that I get about wood look tile floors.
1.) Does it feel like real wood? No, tile is naturally harder than wood. Because of this, it is more durable, but it can be harder on your feet and back. It also does not absorb sound like wood. It feels and reflects sound just as regular tile does, because it is porcelain.
2.) Many people have figured out that the longer planks look more like wood. Our planks are 6x36". A frequent question is: Are the longer tiles more likely to fracture and fail? In the year that we have been living with our tile, we have had no problems with cracks or breakage. Our tile guy really took his time prepping the floors and laying the tile correctly.
3.) Are the expensive tiles really worth more than the more inexpensive versions? In my opinion YES, for multiple reasons. First, to achieve a more realistic look, longer tile planks tend to look better. Inexpensive tile are generally 6x24" and the longer the plank, the more expensive they run. Second, if you want minimal grout line, as we did, you will want rectified tiles, which will increase the price. Rectified tiles can be placed with a 1/16" grout line. Finally, many of the more expensive tiles are color body tiles, so if they chip, they will be brown straight through instead of having a white patch where the chip occurred.
4.) How do I know which grout color to choose? Ask your installer to show you some test patches. This really solidified our decision when we saw several samples next to each other. Many of the brown grouts that looked dark on the color swatches, appeared much lighter when they were put down next to the tiles. Spend the extra money and do a test sample of the grout. The piece of mind was worth every extra cent to us.
5.) Is the tile cold? It can feel much cooler than wood. For us, this was actually a benefit as we live in a warm climate. If you are living in a cold climate, you may want to consider heating under the tiles.
6.) Would you choose this again? Definitely. I have seen unthinkable things happen to this floor and it still looks great. One morning we woke up to find our freezer had broken and water was sitting on the floor all night. Real wood would have been a goner less than a year after install. Thank God it was tile and we just wiped the mess up. My boys crash cars in the tile, spill food, even get marker on it and we never have problems.
And now for the photos.
First, I will show you the evidence for choosing tile:
This is real wood in our home, and this is the reason we chose tile. When we bought this 7 year old home, it came with this lovely patch of wood that had been ruined by a leaky window.
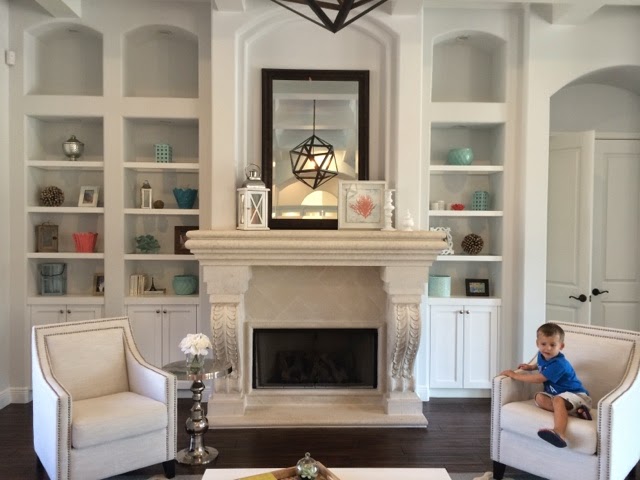
Now, the wood look tile, which runs through most of the main living areas in our home. I think it looks very much like real wood and gives the look I was going for in our decorating.
As you can see, our grout lines are minimal at 1/16". We chose a black epoxy grout, which is easy to clean and has a lovely uniform color.
Close up of our wood look tile with the black epoxy grout.
This is a photo of the room in our home that has real hardwood. This is the reason we chose the black grout. The lines between the planks are dark and I think the grout we chose give our tile a very similar look.
Here are some larger sections of the tile to give you an idea if how it looks throughout the room.
Living room in full sun.
The wood look tile really pulls the room together and many of our guests don't even know it is not wood.
Finally, to wrap things up, here is a short video clip to show why I am so pleased with our choice of tile. My boys can be boys and I don't have to worry about scratches or damage!


