Friday, August 30, 2013

Beam Me Up!


I was delighted to see the start of our new ceiling beam detail today.  It got me really excited to see how this whole project will turn out.  


It should look something like this in the end:


Thursday, August 29, 2013

Demolition Derby

Over the past week, the house has been going through demolition.  A huge dumpster was delivered and it ended up being filled the first day.  A second, larger dumpster was then delivered.  That is now full, and we will be needing a third.  I had no idea there would be so much waste.  We donated everything that we could to the Habitat for Humanity Restore, which I highly recommend if you ever have a large donation.  They came with a box truck and two men and picked it all up and left me with a donation receipt.  
Here are some photos of the progress.

Here are two views of the living room where the tile floors were jackhammered up and the ceiling was removed to prep for a new beam detail that will be added.  It should make for a dramatic entrance. 


In the dining room, the floors were taken up and the only other change was the removal of the circular pillars, which will be replaced with squared.

At one time, this was a master bathroom.  All of the tiles were taken up, the steps up to the tub were removed and the pillars on either side of the tub were removed. 

The master bath cabinetry was also removed.  This was the "hers" cabinet location.

"His" cabinets.

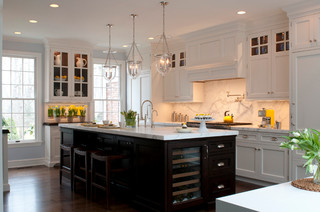
One day this will be a kitchen again.  The heavily detailed darker cabinets and busy looking counters will be replaced with crisp, white cabinets.  I am really excited to see the dream kitchen come to fruition.

This is another view of where the kitchen was.  A ceiling drop down that left the kitchen feeling closed in was removed and will be flattened to match the rest of the ceiling.

In the family room, a built-in for a tube tv was removed and the wall was flattened.

Sagging shelving was removed from the "sewing" room.  We still don't know what we are going to do in this space.  It will probably be a mud room with storage space for the boys as well as a small office and filing area.  

There was a built in desk here that matched the kitchen.  Since the kitchen is in view of this area, we wanted the area to flow.  This will be a desk of the same cabinetry as the kitchen.  New carpet will be on the stairs as well.

In the upstairs bonus room a large tube tv built-in was removed.  Since this room was carpeted, there was a hole where the built-in was removed.  New carpet will go in this space and flow into the guest bedroom.


I can not imagine trying to live in a house going through a remodel like this.  Dust!  Dust!  Dust!  It is fun to see some progress being made though.

Coming Soon!

Demolition photos on the way!

Decisions, decisions.


There are so many decisions to be made for the home.  I wanted to share a few of my "inspiration" photos and then some of the choices we are going with.  If you aren't familiar with Houzz.com, it is an amazing site for finding decorating ideas, but BEWARE, you will want to change everything in your home.  :-)


I love these white Shaker cabinets.  They look so clean and light.

I love grays and these mixes of patterns make me drool.  I don't think I could pull a look like this together on my own, but I am inspired by the grays, crisp whites, wood, and patterns.


And now, on to some of our choices...


We like gray colors, but as I mentioned in a previous post, the house has a bit of a dark feel in some areas due to the window tint that the previous owners had installed.  We looked for pale grays with cool undertones.  This was my husband's favorite, shown on the left in sun and on the right in shade.  It picks up different tones depending on the light.  We placed a few tiles in front of it and they look nice together.  The trim will be painted with a bright, crisp white.  This look will run through all the main areas of the house.
We chose this linen look tile for the master bath floor and shower.  The mosaic band will run across the shower and the pebble will be on the shower floor.  Expect to see lots of crisp whites and chrome fixtures.


We will be recovering some ornate round columns with the squared column on the left.

We absolutely love the look of marble, but we don't have the guts to put it throughout the kitchen.  We settled on a carerra marble for the island and this Caesarstone Pebble quartz for the perimeter.  Quartz will give us a durable work space and the marble with give us the soft, natural look that we love.

Here is a side by side photo of our floor, wall color, perimeter counter material, and island counter material.  Yup, it's pretty gray, but I am hoping to add color with our decor.

To wood or not to wood?


We love wood floors.  They are so warm and inviting.  We love the look, the feel, and the class they add to a space.  Another thing that we also love is having our two boys.  These things may be mutually exclusive.  We love encouraging their innate boy traits, such as their full body playing, running, climbing, and exploring. They are often accompanied on their many adventures by toy trucks and other manly objects.  For our home remodel, we love wood floors and were dying to see them in our space, but we love for our boys' to feel free to be adventurous and free at the same time.  I didn't think I would feel ok seeing metal Tonka trucks flying around my house on a brand new wood floor.  Once I found out that wood floors are also a bad combination with pools, the idea was completely off the table (my Littles are part fish, especially Little One).  We began looking at tiles but we were having a very hard time coming across something that had the feel we were searching for.  Then, like a knight on a white horse, wood look tile walked into my life.  Don't get me wrong, not all wood look tiles are created equal, and some are downright horrible, but if you keep looking, you can come across some beauties.  They are becoming increasingly popular in Europe and you can find some beautiful products if you put in the time while searching.

Here are some of my tips for finding the best wood look tiles: 
1.  Look for longer planks.  Standard planks are 24" long.  If you have a large space, they can look a little busy and fake.  I searched for 36" planks to look more like real wood.
2.  Look for color body porcelain.  This is porcelain that is colored all the way through rather than just the surface.  If a color body tile chips, it will be hard to notice, if a regular tile chips, it will look white.
3.  You want rectified.  A rectified tile can usually be set with a smaller grout line 1/8 or 1/16 and I have even seen 1/32.  The smaller the grout line, the more natural the look.
4.  Grout color matters!  Pick a grout color that matches your tile as closely as possible.  Lay out a board ahead of time with some grouted tiles to make sure you have and right and are happy with your choice.  Once it is down, there is no going back.


And now, I want to share some of my favs.

Emil Ceramica's line called Golden Wood comes in a variety if colors and it is rectified for smaller grout lines.  These planks are available in 6x24 or 6x36 I believe.


Ergon WoodTalk looks unbelievably natural.  It has a hand scraped look and it come in several sizes that when put together make a beautiful, unique floor.  Several colors available.


Albero makes these 5x32 planks that look nice in this gombe color.


Gorgeous perfection should be the name of this beauty, but Tabula Bianco is what she goes by.  Beautifully, perfectly colored 6x36 planks would look great in so many spaces.  We were looking for a darker "wood" but this was so beautiful that we almost changed our whole design to accommodate this.


Finally, we decided to go with this 6x36 Marazzi American Hertiage tile.  The longer planks and hand scraped look give it a more realistic look and it has a deeper color that worked with the look we were trying to achieve in our home.  This photo doesn't do it justice, but I wanted to show you a photo that captured the texture of the tile.  This tile is rectified so we are going to try to have it placed with a 1/16" grout line with a dark brown color.

Here's hoping we get the wood look that we love, but the durability that the Littles need.

*Side note for anyone doing a remodel, this was BY FAR our most difficult choice.  We spent months (yes, months!) agonizing about this.  There were some ugly moments in our marriage and frustrations were high.  Once we got past what for us was the hardest decision, the rest started finally falling into place.  Oh yeah, and we remembered how to talk to each other again.  Remodels and renovations are hard!

Wednesday, August 28, 2013

Our First DIY Project

DARK!  DARK!  DARK!

The overall feeling of the house when we first saw it was dark.  Dark walls, dark curtains, blinds all pulled closed and tint on the windows.  We started wondering if we were buying the house from vampires, it was just that dark.  After closing, the very first project we wanted to do was remove some of the dark window tint.  It is on all the windows in the house, but we decided to remove it from some of the windows and sliders in the back of the house. 

We watched a few videos online on how to remove tint and we decided this was definitely a DIY job that we could bang out in a weekend while the Littles explored their new digs.


Here you can see the difference in the amount of light coming in as we peeled back the corner.

Things were looking good, and the tint was peeling back slowly but surely and we were feeling pretty good.


Here is Little Two helping me peel the tint.  Next to my head is another slider half way done.

Once the tint was off, we were feeling pretty good about our project, the only thing left to do was clean off the rest of the adhesive that was stuck to the windows.  We knew just what to do, in the videos, you simply spray a solution onto the window and wipe it right off.  Wow, we could not have been more naive about how difficult the adhesive removal would be.  The spray solution didn't work at all.  It was actually laughable.  We tried steaming the windows.  Nope.  Windex?  Nuh-uh.  Straight ammonia?  Forget it.  Acetone?  Ha!  That just smears it around and fogs the windows more!  Goo-Gone, Goof-Off, soap and water, vinegar, rubbing alcohol, oils, and more...nothing worked.  By this point, we were three days into the project with horribly smeared, sticky windows and no end in sight.  After countless hours searching the web, we decided to buy razors and go at these enormous 12 ft sliders inch by inch using hot, soapy water as a lubricant.  In the end each slider took a full day to scrape and then was still left with a film that a Mr. Clean Magic Eraser and a whole lot of elbow grease were able to remove, but we were left with MANY scratches on the windows from the razors.  In addition, the pain of what we had hoped to be a weekend project, but had turned into two weeks of scraping and scrubbing was a tough wound to our egos!  Would I do it again?  NOPE!  I don't regret taking the tint off one bit, but I sure wish we had hired someone who knew what they were doing.  So far,  House 1  Us 0.  Hopefully next time we come out with a win on our side!

New Home :-)

We bought a new home for our young family, but the previous owner's taste was far different from our own.  We had searched for the "perfect" house for years, but after having never seen anything our style, we decided to buy a home in our desired location (close to the Hub's work and near great schools for the Littles) and MAKE it our own.  We are working with a contractor and doing some smaller projects on our own.

Below are some "before" photos (take on my iPhone, so not the best quality.)  

Powder Room
Kitchen Island
Kitchen Work Space
Pantry

Kitchen Ceiling Drop Down

Family room
Living Room
Dining Room
Living Room Wet Bar
Wet bar opposite side
Living Room Fireplace
Master Bath "Her" Vanity
Master "His" Vanity
Master Tub
Master Shower


Upstairs Bonus Room with built-in
Shelving in what was their sewing room (we still have not decided what we will be using this as)

Watch for some changes!